Image Map
Would you be so kind as to "like" my facebook page?

Please excuse the lack of photos in some of my older posts as I am trying to slowly go back through and add the photos that were accidentally deleted

Showing posts with label Desserts. Show all posts

April 20, 2015

Chocolate Peanut Butter Crunch Bars

Time for another month of The Secret Recipe Club!


This month I was assigned to Kara's blog, Happy Go Lucky. So many yummy recipes to choose from, like her Pizza Casserole, Samoas Milkshakes, and Jalapeno Pimento Cheese Spread... can I have them all?!? At once? But man, I couldn't pass up a chance to make these.


These remind me of peanut butter crackers.... with chocolate. Mmmm. The chocolate and peanut butter really shown through, along with the crunch of the crackers. And the graham cracker concoction that goes in the middle?! I wish there was more! I think in the future I'm going to try it without the peanut butter, and maybe with some sea salt on top to give it that sweet and salty taste I always love. So many ways you could go with these! You could try with different kinds of crackers... maybe Townhouse (love!). Or use saltines and make something that kinda resembles these guys.


Basically, what I'm trying to say is, whether you're a peanut butter, chocolate, caramel, crunchy-crackery-graham crackery-lover, or all of the above, you'll enjoy these treats :)

Thanks for the great recipe, Kara! And I'll be back to make that casserole for sure.

*Note: we didn't use the whole box of Club crackers, but almost all of it.


Chocolate Peanut Butter Crunch Bars
from Happy Go Lucky
  • 1 box of Club crackers
  • 1 box of Honey Maid Graham Crackers
  • 1 cup (2 sticks) butter
  • 1 cup brown sugar
  • 1/3 cup sugar
  • 1/2 cup milk
  • 1 cup semi-sweet chocolate chips
  • 2/3 cup peanut butter
Line an ungreased 9 x 13 pan with foil. Spray foil with cooking spray to prevent bars from sticking. Line the bottom of the pan with Club crackers.

Crush graham crackers using a food processor.

In a large sauce pan, melt butter. Add crushed graham crackers, brown sugar, sugar, and milk. Bring to a boil; let boil for 5 minutes, stirring occasionally. 

Pour 1/2 of the mixture over the crackers. Place another layer of crackers and spread the remaining butter mixture over the crackers. Top with a third layer of crackers.

In a small sauce pan, melt chocolate chips and peanut butter over medium-low heat. Spread evenly over the crackers.

Cover and chill for at least one hour before cutting to allow to set.


Check out my past Secret Recipe Club posts!  

Linking up here.
   

Peace, and bacon grease!


December 15, 2014

Brown Butter Chocolate Chip Cookies

Happy holidays!


Tis the Christmas season and I'm loving it as always. Aside from being busy and a lot going on in the past month - I left my job of 7 years and started my new full time counseling career on Monday!, passed my NCE counseling exam on Friday, and have been finishing up my last semester of grad school and applying for my licensure - I am super excited for Christmas! I always love shopping for presents for my loved ones... it's the best part!

And holiday cookies, of course!

This month we're taking a break from the Secret Recipe Club and some of us are participating in a Cookie Carnival. It's all about the cookies, baby!


I was assigned to Julie's blog, The Texan New Yorker. I've never been to Texas OR New York, so cool! We sound like we have something in common because she used to be a picky eater like me but has expanded her horizons and now enjoys all kinds of foods like I do! She had some tasty cookie recipes to choose from, but brown butter. That's all I gotta say. Brown butter. 

What better way to make a classic chocolate chip cookie even tastier? Add brown butter, that's how. You already know how I like to add brown butter to desserts. So I had to go with her Brown Butter Chocolate Chunk Cookies. 

I actually did heaping tablespoons on one batch and they came out thicker and more cake-like. On the second batch I used tablespoons and flattened the dough and they came out crunchier and thinner obviously. PJ preferred the thick cake-like ones, but I also like the crunchy thin ones. Point is, they're good either way. 

 
Brown Butter Chocolate Chip Cookies
from The Texan New Yorker
  • 1 cup (2 sticks) plus 1 tablespoon unsalted butter; 1 stick needs to be at room temperature
  • 1 cup granulated sugar
  • 1 and 1/s teaspoon vanilla extract
  • 1 teaspoon molasses
  • 1/2 cup packed brown sugar
  • 1 large egg
  • 1 large egg yolk
  • 2 and 1/4 cups all-purpose flour
  • 1 teaspoon salt
  • 1 teaspoon baking soda
  • 1 and 1/2 cups semi-sweet chocolate chips
To brown the butter, melt 1 stick plus 1 tablespoon butter in a medium, silver-bottomed skillet over medium heat. Once completely melted, the butter will foam, froth, and make a crackling noise. This is the water cooking out. Swirl the pan gently and occasionally during this process. Once the water is cooked out, the butter will begin browning. This happens quickly, so do not walk away or attempt to muti-task here. Once the solids reach a rich, chestnut color, remove the butter from the heat and immediately pour it into a separate container. Scrape all the browned bits from the bottom of the skillet. It should smell rich and nutty with no traces of anything burned. Let the butter cool a bit. 

In the bowl of a stand mixer fitted with the paddle attachment, cream the remaining 1 stick softened butter with the granulated sugar on medium speed until light and fluffy, 3 to 5 minutes.

Add the vanilla extract and molasses; beat until incorporated. Once the brown butter has cooled somewhat, pour it into the creamed butter mixture, along with the brown sugar. Cream about 2 minutes until well incorporated. Add the egg and egg yolk, and beat for 1 more minute.


In a medium bowl, whisk together flour, salt, and baking soda. Add the flour mixture, all at once, to the butter mixture and beat on low speed just until the flour is incorporated. Remove the bowl from the stand mixer and fold in the chocolate chips with a spatula. Cover the bowl with plastic wrap and chill in the refrigerator for 30 minutes.


Meanwhile, preheat your oven to 375 F. Line 2 baking sheets with silpats or parchment paper. Roll tablespoons of dough into balls and space about 2 inches apart on the baking sheets.


Bake cookies 12 to 14 minutes until lightly browned on the outside, but still soft and tender in the center. Remove from the oven and let rest for 5 minutes on the baking sheets. Then transfer the cookies to cooling racks. Eat warm or at room temperature.


Printable Recipe


Check back next month when we'll be back to our usual Secret Recipe Club posts  :)


Linking up here. 


Peace, and bacon grease!


October 20, 2014

Salted Brown Butter Crispy Treats

Time for this month's Secret Recipe Club!


This month I was assigned to one of my fave blogs, Veronica's Cornucopia. I love Veronica! I've been a long time follower of her blog for a long time now and love her recipes, writing style, and all of her posts (when I get caught up on them months later, sorry V!). Plus she has the cutest little baby boy, Joshua!!! You can really get a sense of her fun personality here, I mean her glossary is awesome lol. I tend to have my own Desi language too :)  Her recipes are awesome... I've had so many on my list for awhile to try and have made some myself. This.... so tempting. I'm seriously making this salad asap. 

I've been wanting to try her Brown Butter Pumpkin Spice Krispies Treats forever! But dang it when I went to my grocery store, they didn't have the Pumpkin Spice marshmallows :(  Good thing I had seen another delicious rice crispy treat recipe on her blog too that I wanted to try... her Salted Brown Butter Crispy Treats. 

Ok... brown butter. I feel like people should be shouting from the rooftops about it. Ok maybe I'm going a little overboard, but it seriously makes everything better! Main dishes and desserts alike. 


Salted Brown Butter Crispy Treats
from Veronica's Cornucopia


  • 1 stick unsalted butter
  • 1 (10 oz) bag marshmallows
  • Heaping 1/4 teaspoon coarse sea salt
  • 6 cups Rice Krispies cereal (about half a 12-ounce box)
Coat an 8x2-inch pan with non-stick spray.

In a large pot, melt butter over medium-low heat. It will melt, then foam, then turn clear golden and finally start to turn brown. Stir frequently, scraping up any bits from the bottom as you do. When the butter takes on a nutty color and the solids have turned a golden-brown, stir in the salt & marshmallows.

Turn off the heat once the marshmallows are melted and the mixture is smooth. Remove the pot from the stove and stir in the cereal. Quickly spread into prepared pan. You can use a piece of waxed/parchment paper sprayed with oil and press it firmly and evenly into the edges and corners, or use a silicone spatula.

Let cool, cut into squares and serve.


Printable Recipe


These rice crispy (rice krispie?) treats are sooooooooo good. SO much better than your standard rice crispy. That brown butter really makes a difference and gives it this amazing flavor. And I love a little saltiness to compliment all the sweet in my desserts, personally. So these were perfect.

A little too perfect. I couldn't stop eating them! Now I've gotta make more and try those Pumpkin ones before fall is over too.


Check out my past Secret Recipe Club posts!


Linking up here.
 

Peace, and bacon grease!


September 15, 2014

Roasted Peaches with Dulce de Leche and Roasted Walnuts

Time for another month of Secret Recipe Club!


This month I was assigned to Gloria's blog, Canela Kitchen. She lives in Chile and shares her recipes in both English and Spanish! She's been blogging for a long time so she had tons of delicious recipes to search through. Fall is quickly approaching, so her Pumpkin Ricotta Stuffed Shells were calling my name. We recently discovered our newfound love of zucchini so I'd love to try her Zucchini Lemon Cake! And I know her Chicken in Tarragon Sauce will grace our dinner tables here real soon.


But peaches. I couldn't resist peaches. It was a must that I make this recipe. Before all of those pretty peaches are gone!

We didn't peel our peaches but I think next time I'd prefer to do that. I'm weird about peels. And PJ isn't big on nuts (but he loved the little bit of crunch the toasted walnuts added!) so we used less. Use however much of each ingredient you like and you won't go wrong!


Roasted Peaches with Dulce de Leche and Roasted Walnuts
adapted from Canela Kitchen

*Yields: 2 servings
  • 2 peaches, peeled, halved and pitted
  • 4 tablespoons butter, melted
  • 3 tablespoons light or dark brown sugar
  • vanilla bean ice cream
  • 1/3 cup walnuts, chopped
  • dulce de leche, for topping (we used this kind in the squeezable bottle)
Heat oven to 350 degrees F. Place halved peaches, cut side up, on baking sheet with edges. Brush tops with 2 tablespoons of melted butter, and sprinkle with 1 tablespoon of brown sugar. Roast for 25-30 minutes until peaches are soft.

Meanwhile, toast walnuts in remaining butter and brown sugar for 5 or more minutes, until walnuts begin to brown and are lightly toasted (you may want to stir them). Allow to cool.

Serve peaches with vanilla bean ice cream, dulce de leche topping, and toasted walnuts.


Printable Recipe


Check out my past Secret Recipe Club posts!


Linking up here.


Peace, and bacon grease!


July 21, 2014

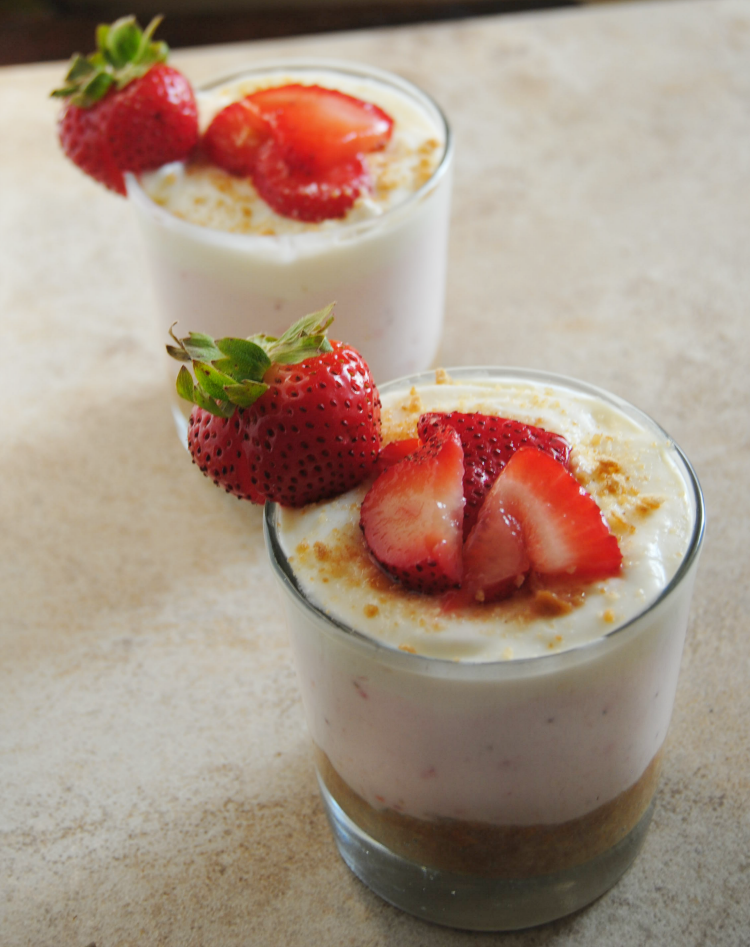
Strawberry Lemon Cheesecake in a Glass

Secret Recipe Club time!


This month I was assigned to Manuela's blog, Manu's Menu. She lives in Australia! So cool! Her blog is filled with wonderful Italian recipes... lots of which were new to me and I had never heard of! I learned a lot perusing through her recipe archive (a visual recipe archive!). I was tempted to try my hand at macarons, this lamb curry looks magnificent, and omg look at this gorgeous dessert! But in the end I was intrigued by her adorable Strawberry Lemon Cheesecake in a Glass and decided to make that.


We loved the pairing of tangy, tart lemon and sweet strawberries and cream in these cutie no-bake cheesecakes! PJ claims he doesn't like lemon, so I made sure to only add a little bit of the lemon layer. He said it wasn't too much lemon and he really liked it! I love me a good graham cracker crust or crumbs, so that added a nice sweet crunch to all the creaminess. 


I have some of both the lemon and strawberry mixtures left because I only made 2 mini cheesecakes, 1 for each of us. I used a mini 9 oz dessert glass for each of us. So we've got lots of filling left and I know I'll be whipping up a couple more cheesecakes for us tomorrow, and the next day!


Strawberry Lemon Cheesecake in a Glass
adapted from Manu's Menu

For the Crust:
  • 2/3 cup graham cracker crumbs
  • 2 tablespoons melted butter
Combine the graham cracker crumbs with the melted butter and press the mixture into the glasses. Chill for 30 minutes. 

For the Marinated Strawberry Garnish:

Meanwhile, slice some strawberries and add with sugar to a bowl to let marinate for 30 minutes.  

For the Lemon Cream:
  • 4 oz cream cheese, softened
  • 2/3 cup sweetened condensed milk
  • 1/4 cup fresh lemon juice
  • 1/2 cup whipping cream + 1/2 tablespoon caster sugar
Put the softened cream cheese, sweetened condensed milk, and lemon juice in the mixer bowl and whip it with an electric mixer until smooth. 

Whip cream and caster sugar until stiff peaks appear. Gently combine it to the lemon mixture. Set aside.

For Strawberry Cream:
  • 8 oz cream cheese, softened
  • 4 tablespoons caster sugar
  • 2 tablespoons fresh lemon juice
  • 8 oz strawberries
  • 3 tablespoons caster sugar
  • 1 cup whipping cream + 1/2 tablespoon caster sugar
Whip the whipping cream and caster sugar and set aside. 

Puree the strawberries with the lemon juice and 3 tablespoons caster sugar.


Beat the cream cheese and 4 tablespoons caster sugar until smooth. Beat in the strawberry puree until smooth. Gently fold in the whipped cream.


To Assemble:
Gently spoon the strawberry cream on top of the chilled base up to 2/3 of the glass. Top with the lemon cream. Garnish with the marinated strawberries and additional graham cracker crumbs. Serve chilled.

Printable Recipe


I know I've thrown 2 strawberry recipes at you recently (check out my Strawberries and Cream Pancakes!) but can you really go wrong with strawberries???


Check out my past Secret Recipe Club posts!


Linking up here.


Peace, and bacon grease!


June 19, 2014

Classic Banana Bread

Banana bread!!!!!!


We made this delicious banana bread for PJ's mom on mother's day. It turned out super delicious, though a bit dense. I think I may have over-stirred the batter. So the results were a flatter, heavier, more dense banana bread that was still so good. I approved, PJ approved, family approved, and mama-in-law approved! 


Classic Banana Bread  
from Inspired Taste

* Yields: 1 loaf
  • 1 and 1/2 cups all-purpose flour
  • 1 teaspoon baking soda
  • 1/2 teaspoon kosher salt
  • 3/4 teaspoon ground cinnamon
  • 3 medium bananas (overripe and brown)
  • 1/2 cup (1 stick) unsalted butter, melted and cooled
  • 3/4 cup light brown sugar, packed
  • 2 large eggs, lightly beaten
  • 1 teaspoon vanilla extract
  • 1/2 cup walnuts or pecans, toasted and chopped, optional (we didn't use)
Preheat oven to 350 degrees. Butter and flour an 8.5 x 4.5 x 2.5-inch (or 9 x 5 inch) loaf pan. Place the loaf pan on an insulated baking sheet or on two regular baking sheets stacked on top of the other.

For the batter, whisk the flour, baking soda, salt and cinnamon together, set aside.

Mash bananas in a medium bowl. Whisk the melted butter, brown sugar, eggs and vanilla into the bananas until blended. With a large rubber spatula, scrape the sides and bottom of the bowl then add the dry ingredients in 3 parts, stirring gently until they disappear and the batter is smooth. Stir in nuts, if using.
  
Pour batter into the loaf pan and smooth the top. Bake 55 to 75 minutes, or until a knife inserted into the center of the bread comes out clean (if you use a 9x5 inch loaf pan, begin checking for doneness 5-10 minutes earlier). After 30 minutes in the oven, check the bread for color. If it looks like it is browning too quickly, loosely cover with aluminum foil. 

When the bread is done, transfer it to a wire rack to cool in the pan for 5 minutes. Remove from pan and place right side up on the rack. Cool completely.

For Storing: Wrap the bread tightly in plastic wrap and store at room temperature overnight or in the refrigerator for up to 5 days.


Printable Recipe


Pictures were taken on my camera phone, hence the blurriness in them. This banana bread was still the bomb.com (do people still say that? apparently I do). 

Morale of the story. Banana bread makes all things better. Dare I even venture to say it's good for you? It has bananas in it, I mean come on! Ok Ok I'm pushing it. It is, however, good for the soul. True story.

Linking up here.
Peace, and bacon grease!