December 25, 2011

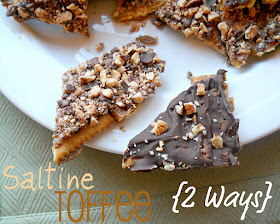
Saltine Toffee aka Christmas Crack.... 2 Ways {Week 11 of The 12 Weeks of Christmas Cookies and Sweets!}

Ho, Ho, Ho.... Merry Christmas!!!

I spent the day with my loved ones, as I hope all of you did, so I've scheduled this post for you today. 

I've got some crack for you :)

Not the illegal crack that can kill you. But this totally legal Christmas crack that could also probably kill you if you eat it too much. But before it does it will make you oh so happy.

"Christmas crack" for you on Christmas. My gift to all of you!


This stuff really is like crack. Actually I can't say that. I've never tried crack before and never plan to. But this stuff is addictive. I was wanting to save some to gift in little goodie bags for mine and PJ's coworkers, and both of our families. But I think I'll have to make another batch because we've been snacking on it nonstop! I plan on taking a little of this batch to my future mama-in-law to try, as well as one of PJ's coworkers. They both are always so supportive of my blog so of course I like to share my successes with them. Also I took some to my family's house today for Christmas to see what they thought about it and they all really liked it, especially my brother. He kept making "mmm" noises and making those faces that you make when something tastes almost too good to be true. I'll have to whip up some more for small gifts to others.

There are two ways to make your Christmas crack:

1. with milk chocolate Heath toffee bits


-OR-

2. with chocolate and chopped nuts


Both are delicious, but I like the toffee one best. Something about the intense sweetness of the heath bits mixed with the saltiness of the crackers. Man oh man. The chocolate and nuts ones are delicious as well but not as sweet in my opinion. Dare I suggest using the toffee bits, chocolate, and nuts? Double dog dare. I'd eat a plate of either kind as my last "meal" on earth if I had the option. It's that good, people.


Which is probably a bad thing. For my health, anyways. I want it so bad, but it can't be healthy for me, I realize. Man, this really is starting to sound like a straight-up addiction! Tina's right, I'm hooked.

Saltine Toffee (aka Christmas Crack) - 2 Ways
ever so slightly adapted from Mommy's Kitchen
  • 1 and 1/2 sleeves saltine crackers*
  • 1 and 1/4 cups butter
  • 1 and 1/4 cup dark brown sugar
  • 6 oz milk chocolate chips
  • 1/2 cup chopped pecans
  • 4 oz Heath milk chocolate toffee bits
Preheat oven to 400 degrees. Line a rimmed baking sheet with foil. Lay crackers out on sheet in one layer. In a medium saucepan, add the butter and brown sugar together, stir often and bring to a full rolling boil. After it comes to a full rolling boil, boil the mixture for 3 minutes.

Pour the "caramel" mixture over the saltine layer and bake for 5 minutes. Remove from the oven and sprinkle half of the crackers with chocolate chips and wait until they are almost melted and then spread the chocolate evenly all over the saltines. Sprinkle the chopped pecans all over the top of the chocolate as evenly as possible. Sprinkle the milk chocolate toffee bits evenly over the remaining saltine crackers. Refrigerate for two hours and then break it up into pieces and store in an air tight container.

*Note: My saltine crackers box had tiny packs of crackers within it, so I didn't really use 1 and 1/2 sleeves. Just make sure to completely cover the baking sheet with a single layer of crackers.

Printable Recipe

I just love the mix of salty and sweet. Each bite is like a foodgasm in my mouth.
Just this once, it's ok to be an addict. I won't judge you, I'm right there with you. We'll get through this together....


I'm linking this up to Week 11 of The 12 Weeks of Christmas Cookies and Sweets. Thanks for hosting, Brenda. I hope all of you will check out the other goodies in the blog hop below:


Merry Christmas to all, and to all a good night! 


December 24, 2011

Oreo Truffles {Week 10 of The 12 Weeks of Christmas Cookies and Sweets!}

Ok, ok I know it's not really week 10 of The 12 Weeks of Christmas challenge. It's actually Christmas eve!! 


Merry Christmas eve, everybody. I'm so excited, like a little kid. I love opening presents and watching my loved ones open theirs. I can't wait to start a family of our own and make traditions with our little ones, like leaving out milk and cookies for Santa, and recording them opening their gifts every year.

But I'm getting ahead of myself here. No babies yet.


But I do have these babies! Oreo truffles. I'm sure you've seen them around blogland before. I just knew I had to make them and add them to my Christmas cookie collection.


Oreo Truffles
ever so slightly adapted from Chef n Training 
Chop oreos up finely in a food processor. Save some of the finely crushed oreos for garnish later and set aside.

With your hands, mash the softened cream cheese and crushed oreos in a large bowl until well combined.

Roll the mixture into 1" balls and place on a wax covered cookie sheet. Place in the freezer for at least 30 minutes to allow to harden.

Once balls have hardened, melt the white chocolate in a microwave-safe bowl according to directions.

Pull the oreo truffles out of the freezer and dip into the chocolate. Garnish with reserved oreo crumbs before the chocolate sets. Refrigerate and enjoy.

*Note: You can use regular oreos, or double stuffed oreos, if you don't think you'd like the berry-flavored oreos. Also, you can use up to 8 oz of cream cheese, depending what consistency you want the truffle to be. I think I ended up using a 12 oz package of white chocolate chips for melting. I also used a deep cup with tall sides to make dipping the balls into the chocolate easier. I used a toothpick to dip them in, but often times they kept getting stuck in the melted chocolate. Maybe it would work to use a fork to roll and coat the balls evenly in the chocolate, instead. With practice, I'll learn the perfect technique hopefully and keep you guys posted. 

Printable Recipe


You've gotta add these to your holiday baking treat list. The recipe is simple enough and definitely a keeper. Not gonna lie though, I do have problems making them look as pretty as some... that dang white chocolate can be tricky to work with... for me at least. But some of my truffles turned out better than others (I just don't photograph those ones), and with practice I bet I can make them even prettier. They sure did taste great!


I'm off to open a Christmas eve present with my love. Maybe I'll have a cup of egg nog, too.

As always, I want to thank Brenda for hosting and putting up with my lateness. Be sure to check out the other holiday treats in the blog hop below:


Peace, and bacon grease!


December 19, 2011

Menu Planning - Week of 12/19/11

I've been a naughty blogger. I've neglected this here blog during the time I wanted to be there the most. I've wanted to share tons of Christmas goodies with you all month, but man time just gets away from me. And here it is, almost the end of the month and I've only given you a few posts here and there. Bad Desi, bad.

Maybe it's because I'm getting a new camera soon and have no motivation to photograph anything with my old point and shoot unless absolutely necessary. Or maybe it's all this Christmas shopping I'm doing that leaves hardly any time to even think about blogging. Not sure, but I hope to at least finish my 12 Weeks of Christmas posts before the new year!

I figured to get back in the hang of blogging, I should get back to my menu planning posts. Man, I haven't followed a menu plan in weeks. A couple weeks ago I was incredibly sick, so I did no cooking at all! This past week we didn't do much cooking either. I think yesterday was the first day we actually got back in the groove of cooking at home. We've both missed it, we agree. Some good old bacon, omelets, and hashbrowns really hit the spot for dinner last night. Definitely beats eating out anyday.


Monday 12/19/11:  Cold Avocado Soup with Sweet Corn and Bacon + ciabatta bread

Tuesday 12/20/11:  breakfast for dinner

Wednesday 12/21/11:  Buttermilk Cornbread Topped Chili

Thursday 12/22/11:  eat out

Friday 12/23/11:  Oven Baked Frito Pie


Sunday 12/25/11:  CHRISTMAS!! dinner at my Mama's  :)


Merry Christmas week!!! I hope you all get everything you wanted. Hopefully I'll be back throughout the week with some 12 weeks of Christmas treats.....

I said hopefully....


Peace, and bacon grease!

WWDB? Red Velvet Chocolate Milk

Go to Target and buy this.

Seriously.

It's Christmas in a glass.

Yep, holiday red velvet chocolate milk.


I first discovered it last Christmas season and have been waiting all year to get some more. Seriously, they need to sell this stuff all year long. Just take off the "holiday" and red velvet milk can be enjoyed any time of year, in my humble red-velvet lovin' opinion.

But for now, since it's not sold all year round, make sure to stock up on this stuff next time you're at Target. I didn't think there was any way to make chocolate milk better. There is... just make it red velvet chocolate milk. Sold!

Peace, and bacon grease!

December 12, 2011

December's Secret Recipe Club - Peanut Butter Cookies w/ Peanut Butter Buttercream

Hey yall!

I'm back for another edition of The Secret Recipe Club. Why haven't you joined yet?

For December, I was assigned Katie's delightful blog, Betcha Can't Eat Just One. Man I need to get more on my baking grind like Katie!


Several recipes were calling my name, but when I saw her Peanut Butter Buttercream, I knew it was the one. PJ and I had recently ordered a dozen cupcakes and a few of them had this delicious peanut butter buttercream, so I had to try my hand at it. I decided to make her homemade Peanut Butter Cookies too (minus the bacon) to go along with the buttercream, since I'm not too big on brownies. Genius, I know. And the cookies are supposedly gluten-free so, win-win.


Peanut Butter Cookies with Peanut Butter Buttercream
adapted from Betcha Can't Eat Just One

Peanut Butter Cookies
  • 1 cup smooth peanut butter
  • 1/2 cup brown sugar
  • 1/2 cup granulated sugar
  • 1 egg
  • 1 tsp baking soda
Preheat oven to 350 degrees.

Beat the peanut butter and sugars together for about 2 minutes.  Add the egg and the baking soda.  Mix two minutes more.


Roll into walnut size balls, roll in sugar and flatten with a fork.

Bake 10-12 minutes. 

Let cool 5 minutes on the pan and then transfer to wire racks.

Peanut Butter Buttercream 
  • 1/2 cup of softened, unsalted butter,
  • 1/2 cup of peanut butter, 
  • about 3/4 cup powdered sugar
  • pinch of salt
  • 1 tbsp heavy cream. 
Beat the butter and peanut butter until it’s well combined.  Add the sugar, pinch of salt, then drizzle in some heavy cream and mix until everything is light and fluffy. Spread buttercream over cookies or make sandwich cookies. 

Printable Recipe


Make a cookie samich!

And don't forget to check out all of the other delectable recipes in the blog hop below:


Peace, and bacon grease!


December 7, 2011

Raspberry Truffle Fudge {Crazy Cooking Challenge + Week 9 of The 12 Weeks of Christmas Cookies and Sweets!}

Hey yall!

Photobucket

This month for the Crazy Cooking Challenge, we are all trying to find the ultimate fudge recipe. I have bookmarked a ton that were in the running, but I finally settled on this recipe because I thought it was pretty unique, plus I can always count on Cassie's recipes.


Yes, friends. Raspberry Truffle Fudge. Doesn't it sound fancy and amazing all on its own? I think so.

Raspberry Truffle Fudge
  • 3 cups semi-sweet chocolate chips
  • 14-oz can sweetened condensed milk
  • 1 and 1/2 tsp vanilla extract
  • pinch or two of salt

  • 1/4 cup heavy cream
  • 1/3 cup raspberry preserves
  • 2 cups semi-sweet chocolate chips
Spray a 9x9 inch pan with cooking spray and line with wax paper. 

In a microwave-safe bowl, combine 3 cups chocolate chips and condensed milk. Heat in microwave until chocolate melts, stirring occasionally. Don't let it scorch. Stir in the vanilla and salt. Spread into pan and cool to room temperature.

Now, in a microwave-safe bowl, heat raspberry preserves until smooth. Strain seeds using a fine mesh strainer. Stir in cream and 2 cups chocolate chips. Heat in the microwave until the chocolate melts and stir until smooth. Cool to lukewarm, then pour over the fudge layer.

Refrigerate until both layers are completely set, about 1 hour. Cut into 1 inch pieces.


Printable Recipe


*Note: I used a loaf pan instead of a 9x9 inch dish. I did spray it with cooking spray but didn't line it with parchment paper because I didn't have any, and because I'd tried using foil before and didn't like how it stuck to the fudge. So I just poured the mixture directly into the loaf pan. I would recommend using parchment paper if you can though, because it was difficult cutting it out of the loaf pan and getting perfectly serrated pieces. 

Basically, do it like Cassie does it.

Also I had problems removing the seeds through a fine mesh strainer. None of the raspberry preserves would filter through the strainer, so I ended up not being able to de-seed the preserves. So some of my fudge pieces had little seeds in them. I just ignored them when eating the fudge, which is otherwise delicious! But definitely de-seed if you can. Wonder if I just had a crappy strainer or how others got that to work well??


Vote for The Ultimate FUDGE recipe by clicking on the "like" buttons in the blog hop below. I sure would appreciate a vote from you... I'm #73  :)


And since I can, I'm also submitting this as my week 9 entry of The 12 Weeks of Christmas Cookies and Sweets, cuz it's also a perfect holiday treat! Your friends, family, co-workers, neighbors, ANYONE who receives these as gifts will love you forever. I know I would.


And check out the blog hop below for tons of Christmas baking ideas. Thanks for hosting, Brenda!


Peace, and bacon grease!


December 5, 2011

Menu Planning - Week of 10/5/11

Happy Monday, friends. We're getting closer and closer to Christmas.... are you ready? I went to the mall this weekend and the madness has officially begun. CRAZINESS in the parking lot. Almost had to punch a few people. And it's only the beginning of December. I yi yi.

Got a little shopping done here...


and here...


and no, not Christmas shopping. It was all for me.


Watched the finale of this on Saturday night....


And yelled at the tv alot on Sunday thanks to these guys.

I kid, I kid


Why does Dalton look so happy after such a disappointing and embarrassing game? You shouldn't be smiling, rookie!
 

Anyhoo. That was my weekend.

Me and the menu plan have had an on and off relationship lately. And it's back on. I was being a bad partner, but now I'm back and trying to stay committed to it. 


Monday 12/5/11:  Chicken Tacos (for PJ), buffalo chicken for me

Tuesday 12/6/11:  Cold Avocado Soup with Sweet Corn and Bacon, and ciabatta bread

Wednesday 12/7/11:  BLT Crescent Sandwiches, and Garlic Italian Knots

Thursday 12/8/11:  eat out

Friday 12/9/11:  Steaks with Sauteed Spinach with Caramelized Red Onions and Pine Nuts

Saturday 12/10/11:  Breakfast for dinner which means mushrooms & onion omelets, bacon, cheesy eggs

Sunday 12/11/11:  Mini Lasagna Cups, with garlic bread


It's literally been raining all day long. I hope it stops soon, it sure does put a damper on the day! PJ and I hope to put up our tree and other Christmas decorations today, so we'll spend this rainy night inside drinking egg nog, playing Christmas music, and decoratin. Hope you all have a nice week.


Peace, and bacon grease!


December 4, 2011

No-Bake Cookies & Cream Treats {Week 8 of The 12 Weeks of Christmas Cookies and Sweets!}

Remember the other day when I said I'm a tad majorly behind on my 12 Weeks of Christmas posts? I warned ya, I'm linking up wayyyyyy back to Week 8 of The 12 Weeks of Christmas Cookies and Sweets challenge. "Why?", do you ask? Why not just skip those weeks and catch up on the current week? Because even though I'm posting late, I don't want to have gaps where I didn't participate. I don't want to look back and see that I only participated in 8 out of the 12 weeks, and therefore don't truly have 12 Christmas goodies to share. I feel like I'm cheating the challenge a bit, and if someone searches for my "12 weeks of Christmas treats", I don't want them to be disappointed if they find less than that. Even though I am posting late, it's better late than never.


I couldn't get the best photo of these thingies. But they are oh-so-good! If you like marshmallow, I should say. PJ didn't like them very much because he doesn't love marshmallow. But I usually also don't love marshmallow either, but I loved these treats! Couldn't stop eating them.

Bakergirl says to use an 8x8 inch baking dish... I used a loaf pan because that's the closest thing I had to that. I thought about using my 9x13 but figured the loaf pan would work better. I also lined the pan with foil like the recipe said, but I didn't like how I had to peel bits of aluminum foil off of the treats when I cut it. Next time I would just lightly grease the pan with butter or spray so that the mixture wouldn't stick, and not use aluminum foil. I've adapted the recipe below to reflect that change. I also refrigerated the mixture so it would harden and be easier to cut. I did serve them more at room temp though so they wouldn't be so hard when eaten. I just wanted them hard at first for cutting purposes, but wanted a nice, chewy texture when served. You can refrigerate them before cutting if you want... it worked fine for me, but it's not stated in the original so use your own discretion. Either way, these treats are sure to please marshmallow and oreo-lovers. Fo sho!


No-Bake Cookies & Cream Treats
ever so slightly adapted from Bakergirl
  • 1 (16 oz) package of Oreo cookies
  • 5 cups (a 10 oz bag) of large marshmallows
  • 4 tbsp butter
Spray or lightly grease a loaf pan or 8x8 inch baking dish and set aside. 

Place oreo cookies in a food processor, several at a time, and pulse until crumbly but not ground. 

Melt marshmallows and butter in a large microwave-safe bowl, about 1 and 1/2 to 2 minutes. Remove from the microwave and pour in the ground cookies. Quickly stir to combine, then transfer to the baking dish.

Allow to set for 15 minutes or more. Refrigerate, if desired, then cut and serve.
Printable Recipe


And of course I love that they are no-bake. Makes life easier at times. After I do the prep work, all I have to do is stick it in the fridge or freezer and wait. Besides the fact that they are no-bake, they also only require three ingredients. No cooking required. Few ingredients. So delicious. The perfect treat!

Check out some other tasty Christmas goodies in the blog hop below and contact Brenda at Meal Planning Magic to participate, though there's only a couple weeks left!


Peace, and bacon grease!


Restaurant Review : Johnny Rockets in Kenwood

Remember Johnny Rockets? I do, from like 1998. For reals, the last time I had eaten there, I was probably 13, maybe younger. All I remembered was over-priced, mediocre food at Tri-County mall back when I was a teen. I truthfully didn't even know they still existed! But my friend and I were shopping at Kenwood mall and she mentioned eating at Johnny Rockets across the street on Montgomery Road, so I decided to give it another chance and see if it had improved over the 13 years I had refused it.

I went in expecting a pricy menu full of diner food, so it wasn't too much of a shock when I saw that my burger didn't come with fries and that sides were indeed a la carte. Oh well, I was ready for it. I contemplated ordering the sweet potato fries which looked delightful, but were definitely over-priced, I think like $4 something as opposed to $2.79 for regular fries.

Many of the burgers sound intriguing, but I opted for the Route 66 Burger ($7.49), which is a patty topped with grilled mushrooms and onions, mayo, and melted, oozing swiss cheese. The burger was tender and juicy. I added a bit of salt to the burger meat which added more flavor. I was impressed by the burger. Not the best I've ever had, but tasty. Better than I was expecting, I should say.


Though the sides were a la carte, I ordered a side of fries ($2.79) as well. I expected them to come out at the same time as my burger, but they came out as an appetizer, which I didn't really like. I want to eat my fries with my burger, and therefore I want them to come out fresh with my burger. By the time the burgers came out, we were half way finished with the fries, which were a bit undercooked and not as crispy as I'd like, and therefore also not very hot by the time the burgers arrived. They did come out in an adorable metal "frying" container. I wish I had one of those props for my food photography. So old-school diner-like. I liked that presentation. Of course I always find myself surveying all kinds of food props ever since I became a blogger.


Marcey ordered a Double Decker Grilled Cheese which she also enjoyed. Looks good and cheesy. The key to a good grilled cheese is melted, oozing cheese... not caked, hardened cheese. Looks oozy enough.


For the fries, they bring out some cups and draw lil faces made out of ketchup in your cups. I didn't really like it... neither did Marcey. A bit creepy, or am I just strange?


On to the service.... I didn't like the service at this particular location at this particular time. My friend had been waiting at the booth for maybe 5 minutes before I arrived, and as soon as I got there the waiter was asking me what I wanted. I needed time to settle in, look at the menu, and even chat with my girl a bit. He came back quickly again, asking if I was ready, and again I wasn't. I felt like I was being rushed a bit. I understand wanting to get customers in and out, but aren't people allowed to chat a bit while dining these days without feeling pressured?


I'm sure we'll be back since there aren't many cheaper options while shopping in Kenwood, though this place certainly isn't cheap for a burger/diner joint. I'd love to try one of their milkshakes and some more of those burgers, as well as those over-priced sweet potato fries. Maybe one day I'll fork out the money to try them, and maybe share them with someone.


Peace, and bacon grease!


Johnny Rockets (Montgomery Rd) on Urbanspoon

November 30, 2011

Pumpkin {Shaped} Cheese Ball

Oh, hi there. I am indeed alive and have not suddenly vanished off the face of the earth.

I have no good excuse except that I've been busy, like all of you I'm sure.

I've neglected my poor blog for over a week now, and I don't feel good about it. I haven't even gotten to catch up on your Thanksgivings (I've missed you!)... or post any new recipes (sorry, no Thanksgiving recipes)... or even cook recently really (and no menu plan this week)! I feel like a terrible blogger. I truly hope you all did enjoy your Thanksgivings and had plenty to be thankful for. I know I do. I'm thankful for all of you, too! Like, so much. Especially when I don't call or write for over a week. Yall are definitely some keepers.  Don't break up with me, k?

Enough with the sappy talk though, let's get on to the food that I've deprived you of lately.

You know what else makes me a bad blogger? I have been wanting to post about this recipe for the past month and a half! Time just gets away from me. You too? Ok good, it's not just me. I made this to bring to our company potluck lunch at Halloween. I never did post about it though, but figured I could still post about it before Thanksgiving and that you, my readers, could still make it for Thanksgiving if you wanted. Again, I didn't. So here it is. Finally. After Halloween and after Thanksgiving. But before Christmas, at least... pat on the back for that.


This is a pumpkin-shaped cheese ball. Not a pumpkin-flavored cheese ball. I don't want any nasty comments saying someone was expecting a pumpkin-flavored cheese ball recipe. Though that does sound quite enticing. Just coverin' my butt.


Pumpkin {Shaped} Cheese Ball
adapted from Taste of Home
  • 6 oz cream cheese, softened
  • 1 (8 oz) container chive and onion cream cheese, softened
  • 2 oz sour cream
  • 2 cups (8 oz) sharp cheddar cheese, finely shredded
  • 2 tsp paprika
  • 1/2 tsp cayenne pepper
  • 1 celery rib 
  • Sliced apples, crackers, tortilla chips, veggies, pretzels for dipping
In a small bowl, beat cream cheeses and sour cream until smooth. Stir in the cheddar cheese, paprika, and cayenne pepper. Shape into a ball, to resemble a pumpkin. Wrap in plastic wrap. Refrigerate for 4 hours or until firm.

With a knife, add vertical lines to the cheese ball to resemble a pumpkin furthermore. Insert a celery rib (you will have to cut it) for the stem. Serve with dippers of choice.


Make this next Halloween. Or Thanksgiving. Or anytime during the 2012 fall season and those to come. Just be sure to make it before Christmas, like I did, and you'll be a-ok in my book.

*Another reason I am a horrible blogger: I'm behind on my 12 Weeks of Christmas posts! Yikes, tomorrow we are supposed to be on Week 10 I believe... and I haven't linked up since Week 7. So you may be seeing some Christmas goodie recipes coming from me soon that I'll be linking up to past weeks.... going back in time. I'm allowed to do that, right? Hey, if the linky is still open I say it's fair game, even if it is several weeks later! So stay tuned for that.

I'm gonna stop listing reasons I'm a bad blogger now. 

Off to bed to get 5 hours of sleep!!! Gotta love late-night blogging.


Peace, and bacon grease!

November 20, 2011

Menu Planning - Week of 11/21/11

Why hello there, my pretties! How you doin? I'm doing pretty good... bout to wind down from a fun weekend. I did some shopping and lunch at BJ's Brewhouse with Marcey on Saturday, then stopped by to see my cousins Steph and Pope visiting from outta town... so good to see them as always. That evening PJ and I watched some UFC for like the 4th weekend in a row. I'm not complaining! Dan Henderson surprised us and beat Shogun Rua, and there were some other good fights as well. I love UFC. I wish I could train for fun without getting my face messed up.

Sunday we went to Kroger to pick up some lunch meat, chips, and other unnecessary junk. The main reason we went there was to get some hummus so I could write my Foodbuzz post up last minute. Then we scrambled home to watch the Bengals lose to the Ravens... a close and exciting game but still a loss. That Dalton sure did look a hot mess with his 3 interceptions. And boooooo, that Palmer getting good stats with the Raiders. Oh well, our record is still better than anyone expected, and I was prepared for us to not do so well against the tougher teams anyways, so it's not as harsh when it actually happens. Then we used my groupon and went bowling at Western Bowl for 2 games. It was fun just the two of us... a little date night on a Sunday evening. I suck really bad though... bowled a 72 and then a 67. Yeah, I know I suck. How do you get good at bowling?
Tonight we'll eat some chicken tacos, watch some Walking Dead and I'll have a couple beers. Sounds like a good way to end the weekend. Yay for a short work week coming up. I'm excited for Thanksgiving dinners and my niece coming to town.

On to the menu....
Monday 11/21/11:  City BBQ or eat out


Tuesday 11/22/11:  Crock Pot Chicken with Black Beans and Cream Cheese with Cilantro Lime Rice


Wednesday 11/23/11:  BLT Crescent Sandwiches with chips


Thursday 11/24/11:  Happy Thanksgiving!!!! Thanksgiving at my mama's (or on Friday)


Friday 11/25/11:  Thanksgiving at PJ's mom's (or on Thursday)


Saturday 11/26/11:  leftover Thanksgiving meal hopefully


Sunday 11/27/11:  White-Bean Soup with Bacon and Herbs with Italian Garlic Knots


Looks like it's gonna be a fantastic week, my friends! 


I wish everyone a Happy Thanksgiving filled with family, friends, good food, and plenty of things for which to be thankful.


Peace, and bacon grease!